With the LUT Adjustment tools available with higher-level licenses, ColourSpace can both separate and swap different LUT components, enabling the 1D LUT and 3D LUT components to be worked on separately, or one component in a LUT replaced with different data from an alternative LUT.
This can be performed directly with Maths tools, such as Split (1D + 3D) and the Grey Axis Replace functions, or can be user managed via different workflows, and outlined below.
Example applications include swapping a Grey Scale calibration in a full volumetric profile with one generated via a Matrix Calibration or a large patch count Quick Profile when the display is unstable, causing issues with the calibrated grey scale, but for the gamut coverage a true volumetric calibration is required.
It is also possible to perform LUT Concatenation, rather than Swapping LUT Components.
Maths Tools for LUT Separation & Swapping
There are three main Maths tools for LUT Separation & Swapping:
- Split (1D + 3D)
- Add
- Grey Axis Replace
The applications and operation should be fairly self explanatory, but there is additional colour & LUT management information that needs to be understood to gain the correct end result.
With Split (1D + 3D) takes the existing full volumetric 3D LUT and separates it into its 1D and 3D components.
This is exactly as is done with some LUT Upload options where the hardware has separate Front 1D and 3D upload options.
What is key with this function is the separation of the 1D from the 3D is a true separation, meaning the effect of the 1D component is removed from the full volumetric 3D component, leaving the 3D component without any gamma (EOTF) or grey scale adjustment embedded within it.
The Add function can be used to combine different LUT components as desired, be that 1D+3D, 3D+1D, 1D+1D, or 3D+3D...
The Grey Axis Replace function does just what it says, and replaces just the grey axis values with those from an alternative LUT, or with null values if None or Default Unity is chosen as the second LUT option.
This will leave any gamma and grey scale changes in the original 3D LUT component, which in some instances may be the desired result when a manual grey scale adjustment of the display has already been performed, as explained below.
The likely main application for either function is where a manual grey scale adjustment is made in advance of the 3D LUT calibration, and the user wishes to keep that exactly as is, without the 3D LUT making any additional alterations to the grey scale &' gamma (EOTF), regardless if additional corrections should be made or not.
Or for use with displays that include a large 1D LUT capability as a Back 1D that can be calibrated using a large profile patch set with a large LUT Generation Size defined and a 1D LUT uploaded initially to the Back 1D slot, and then a smaller patch set used to re-profile with the Back 1D active, and just the volumetric 3D LUT component uploaded, using either of the new options as desired, with the profiling performed with a smaller LUT Generation Size if desired based on the actual 3D LUT size the display uses.
(Most hardware with both 1D and 3D LUT capability has a far larger 1D LUT size, with a smaller 3D LUT.)
As always with ColourSpace, there are no set defined workflows, leaving the user to be able to choose what is best for any given calibration situation, based on their knowledge and understanding.
User Workflows to Swap LUT Components
A very powerful capability of ColourSpace is the ability to replace individual LUT components, using the LUT Adjustment tools options.
An obvious application is to use the 1D (Grey Scale) LUT component from one calibration LUT and combine it with the gamut only (3D) calibration component from another LUT.
This can be of interest when using lower-end probes to perform full volumetric calibration, which introduce a high number of inaccurate probe readings due to poor low-light capabilities of the probe.
When profiling for LUT based calibration, the usual approach is to use one large volumetric profile to generate the final LUT.
However, there is nothing wrong with using one profile focused on just the Grey Scale, and another profile for the Volumetric Gamut, and then combine the grey scale from one LUT with the gamut component from the other.
Initial LUT Generation
Initial LUT Generation
First, focusing on the grey scale, a Matrix Calibration or a Quick Profile can be used to generate a calibration LUT focussing on the grey scale.
Then a cube based Characterisation can be used to generate a second, volumetric gamut focused, calibration LUT
The 1D LUT component can then be combined with the 3D LUT component to generate a new 3D LUT.
Combine Separate Grey Scale and Gamut 1D & 3D LUT Components
The first step is to extract the gamut only component from the volumetric LUT by nullifying the 1D (grey scale) component.
The second step is to extract just the 1D grey scale component from the second LUT.
The Grey Scale component can then be combined with the gamut only LUT.
The result is a new 3D LUT, with the grey scale (1D) component from one LUT, combined with the 3D, gamut, component of a second LUT.
The process is:
- Make the first volumetric gamut LUT using a cube based profile
- Save the LUT into the Manage Spaces library
- Export the LUT using a 1D RGB 3 channel LUT, such as the VCGT format
- Import the new 1D LUT back into the library
The new imported LUT will be expanded into a full 3D volumetric LUT, but with only 1D data contained within it.
- Open original volumetric gamut LUT within LUT Tools, and select LUT Adjustment/Maths/Subtract
- From the drop down list select the re-imported 1D LUT, and Apply
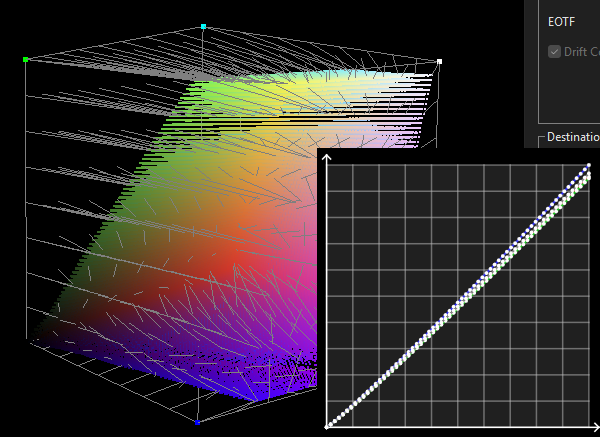
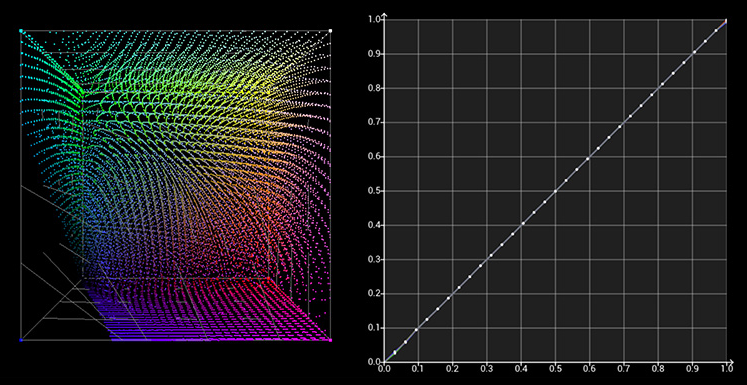
The resulting LUT will have the 1D grey scale component nullified from the full 3D LUT, not just deleting the grey scale points as that is not the correct process required. The entire 1D component must be removed from the full volumetric 3D LUT, as can be seen below.
(Click on one or other of the images to directly compare.)

- Make a second LUT using a Matrix Calibration workflow or Quick Profile
- Save the LUT into the Manage Spaces library
- Export the LUT using a 1D LUT, such as the VCGT format
- Import the new 1D LUT back into the library
- With the new gamut LUT, with original 1D component nullified, held within LUT Tools, select LUT Adjustment/Maths/Add
- From the drop down list select the imported 1D LUT, and Apply
The result is a new 3D LUT, with the grey scale (1D) component from the Matrix or Quick Profile generated LUT combined with the 3D, gamut, component of the volumetric LUT.