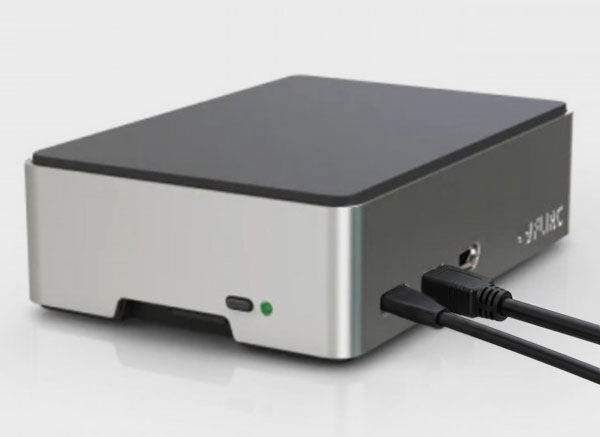
Calibration Client Basic turns a PC into a bit-perfect test pattern generator for ColourSpace - as a floating patch window on any display connected to the PC.
Calibration Client Full adds output through an AJA or Blackmagic video card or Thunderbolt unit, for SDI and HDMI displays.
- ColourSpace INF/XPT/PRO/CAL/LTE & HTX/HTP/HTL & DPS/ZRO
- ColourSpace Manufacturer Specific PRO/LTE & HTP/HTL
- Windows (Mac and potentially Linux to follow)
- Exact 8-bit & 10-bit patches
- SDR and HDR (PQ) in the patch window
- Runs on the ColourSpace PC, or any PC on the same network
- ColourSpace's inbuilt Test Patterns, drawn at the window's resolution
- Light Illusion's display set-up images, plus your own TIFF, PNG, TGA & JPG images
- Impossible settings refused, with the reason shown
- Windows colour checks - calibration curves neutralised while running
- AJA and BMD output (PCIe cards or Thunderbolt units) 10-bit SDI & HDMI, SDR, HDR PQ & HLG, up to 4K 60Hz
- No video card or Thunderbolt unit included
Calibration Client Basic is just the software TPG option
Overview
Calibration Client can be used with all ColourSpace versions with profiling capabilities, including the ZRO licence version of ColourSpace for verification of any display, as well as all main versions of ColourSpace for full profiling and LUT based calibration.
ColourSpace controls Calibration Client directly, via its Network Server hardware option, so it can generate any required colour patch, either as a managed sequence for automated profiling, or manually selected for manual display calibration adjustment.
Calibration Client has been rewritten from scratch by Light Illusion as a modern native application, replacing the original Java version.
- Exact values. The code values ColourSpace asks for are the values written to the screen, in 8-bit or 10-bit - with no colour management, scaling or conversion on the way.
- HDR in a window. With Windows HDR turned on, the patch window sends 10-bit PQ patches, so an HDR display can be profiled from a PC, without any extra hardware.
- Video cards. With the Hardware option, patches go out of the SDI and HDMI outputs of an AJA or Blackmagic video card or Thunderbolt unit, as professional 10-bit video, with the correct SDR or HDR signalling.
- Nothing is quietly changed. If a setting cannot be done - an output mode Windows is not set up for, or a format the video card cannot send - Calibration Client refuses it and shows the reason. It never quietly sends something different, so nothing is measured in a mode you did not choose.
- Nothing in the measurement. The on-screen controls, menu button and mouse pointer all disappear as soon as ColourSpace sends a patch.
- Windows watched. Windows has several settings that silently alter what reaches the display. Calibration Client checks them on the patch display every few seconds, warns when one is active, and sets any loaded calibration curves (VCGT) neutral while it runs - putting them back exactly afterwards.
- Simple connection. Calibration Client finds ColourSpace on the network by itself, and reconnects by itself if the connection drops.
Setup
What You Need
- A Windows 10 or Windows 11 PC, with the display to be calibrated connected to it
(This can be the ColourSpace PC itself, using an extended desktop, or any other PC on the same network) - ColourSpace, with the probe connected to the ColourSpace PC
- For video card output, the Hardware option, and an AJA or Blackmagic video card or Thunderbolt unit, with its manufacturer's driver installed (see Video Cards)
Calibration Client does not keep the display or the PC awake, so it can never be the cause of burn-in on an OLED, or any other display. Before a profiling run, make sure the PC's screensaver, display turn-off and sleep settings will not start during it - and turn them back on afterwards.
Installing
Calibration Client is a single program file, with nothing to install - download it from Customer Downloads, and copy it to wherever you want it on the PC.
Licence
On first start, open the menu (see below), and enter your product key in the Licence section, then select Activate. The Licence section shows the licence level, and the registered key.
- Reactivate - picks up changes made to your licence, such as the Hardware option being added
- Deactivate - frees the licence from this PC, so it can be activated on another
Without a licence the test patterns and images still work, so the program can be tried with your display, but ColourSpace's patches and video card output are off.
On-screen Controls
Move the mouse over the patch window and a menu button appears at the top right, as with ColourSpace's graphs. Select it to open the options bar, with these sections:
- Output - 8-bit SDR, 10-bit SDR or 10-bit HDR (PQ)
(A mode that cannot be used right now is greyed out - hover the mouse over it to see why) - HDR metadata - the HDR10 metadata sent in HDR mode
- Connection - find ColourSpace automatically, or type its address
- Test patterns - the built-in patterns, calibration images and your own images
- Video card - AJA and Blackmagic output (PCIe cards or Thunderbolt units), with the Hardware option
- Information - display information, and a support file to send with any support request
- Licence - product key and licence level
- Window - full screen, always on top, neutralise calibration curves, and the log folder
The options bar closes by itself after 20 seconds without use, and the controls, menu button and mouse pointer all disappear as soon as ColourSpace sends a patch, so none of them can end up in a measurement. Everything set is remembered for next time.
Keyboard
- Double-click, F11 or Alt+Enter - full screen on/off, on the display the window is on
- Esc - leave full screen
- M - next output mode
- P - next built-in pattern
- T - always on top on/off
- I - show/hide the information text
ColourSpace Integration
All Calibration Client patch operation is controlled via the Hardware Options menu, accessed via the Profiling window, using ColourSpace's Network Server hardware option.
For a User Guide on the workflow used for display calibration see the 3D LUT Calibration guide, combined with the specific Calibration Client information contained within this page.

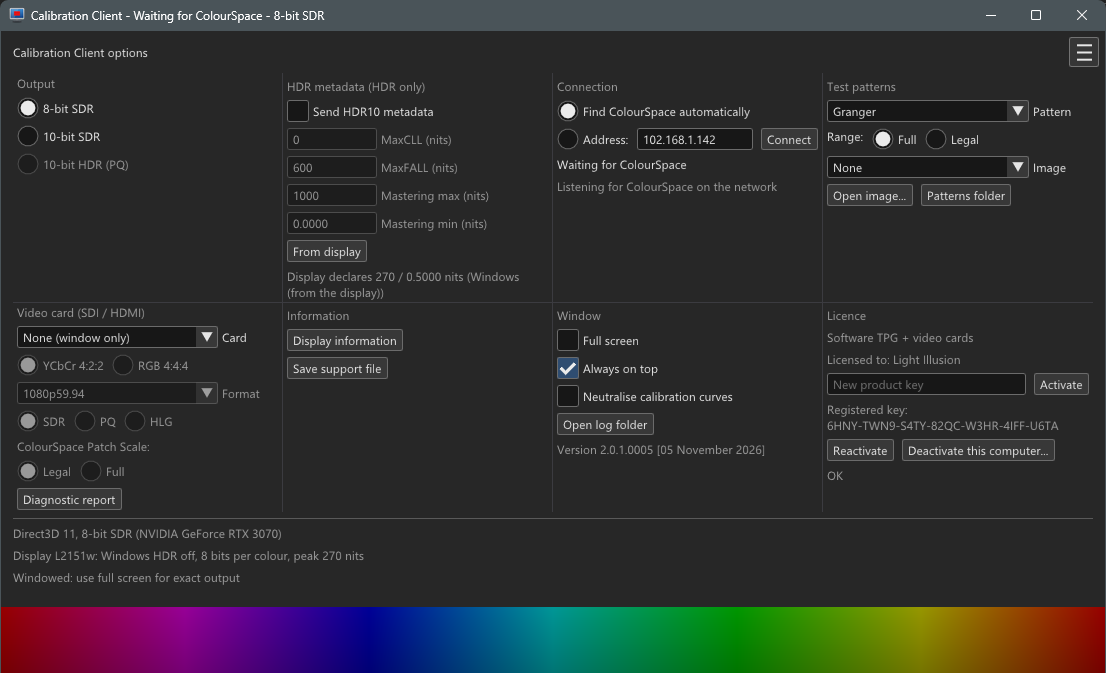
Initial Setup
- Open ColourSpace, and open a Profiling window, select Hardware Options, and select Network Server from the Hardware drop-down list
- Select Connect - the IP address and Port details of ColourSpace show within the Network Server Options
- Start Calibration Client on the PC connected to the display to be profiled
(Calibration Client finds ColourSpace on the network by itself and connects. If it does not, open the Connection section of the menu and type the address ColourSpace shows) - Move the Calibration Client window onto the display to be profiled, and double-click it to go full screen
- Using Calibration Patches select the desired patch option to use for profiling
(Auto uses the patch settings defined within the ColourSpace Settings window
Note: The keyboard 'O' key can be used within the Manual Measure and Hardware menus to quickly Disable/Enable the TPG)
Note: If using separate PCs, make sure both are connected to the same network. A wired Ethernet network is preferred, as Wi-Fi can cause small delays. If there are any connection issues, check for Firewall settings preventing the connection.
Until the first patch, an information text in the window shows the connection status and the output in use. It disappears with the first patch, so it can never affect a measurement. If ColourSpace closes or the connection drops, Calibration Client goes back to waiting, and reconnects by itself.
Settings
Calibration Client shows exactly the values ColourSpace asks for, or refuses with the reason. It never rescales or converts the values on the way.
- Bit depth - set the ColourSpace Settings Resolution bit depth to match the Calibration Client output mode: 8-bit for 8-bit SDR, 10-bit for the 10-bit modes
(If ColourSpace sends 10-bit values to the 8-bit mode, Calibration Client says so in its window title and information text) - Range - ColourSpace sets Legal, Full or Extended values itself, via Patch Scale (see TPG Operation). For the patch window, set the display's input range to match
Profiling Operation
To activate Calibration Client navigate to the desired profiling mode within ColourSpace - Manual Measure, or Display Characterisation.
The output of Calibration Client will mimic the colour displayed, using the patch settings defined via the Hardware Options and Settings menus.
Profiling can then be performed as normal, using the probe connected to the ColourSpace PC, with Calibration Client displaying the required patches on the display being profiled.
LUT Use
After profiling, a Calibration LUT can be generated as normal within ColourSpace LUT Tools, and used where required, either within a grading system, a LUT box, or uploaded directly into a suitable display.
Calibration Guides
3D LUT Calibration Manual CalibrationOutput Modes & HDR
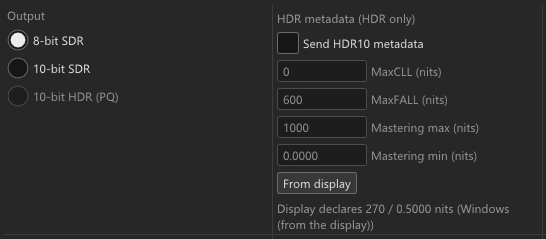
The patch window has three output modes, set in the Output section of the menu, or with the M key:
- 8-bit SDR - RGB 8-bit, Rec.709/sRGB
(Needs Windows HDR off for that display) - 10-bit SDR - RGB 10-bit, Rec.709/sRGB
(Needs Windows HDR off, and a 10-bit link to the display) - 10-bit HDR (PQ) - RGB 10-bit, Rec.2020, ST2084 (PQ)
(Needs Windows HDR on for that display - Use HDR in Windows Settings, System, Display)
A mode that cannot work with the current Windows set-up is refused with the reason, never swapped for something else. Anything that would make the output inaccurate - such as HDR mode while Windows HDR is off - is shown in the window title, and in the information text.
HDR Metadata
In HDR mode, the HDR10 metadata - MaxCLL, MaxFALL, and the mastering display's maximum and minimum brightness - can be set in the HDR metadata section of the menu. Windows passes it to the display.
From display sets the mastering maximum and minimum to the peak and black the display declares in its EDID (or that Windows reports for it). Declared figures are the display's own statement - actual capabilities can vary, and if the true peak is below the declared peak, measured results will differ.
For professional HDR displays set to HDR mode manually, the metadata values should not matter, as there is no tone mapping. With consumer TVs, which use tone mapping, the TV will respond differently to different metadata values - set them as needed to see how the TV responds. Choose the TV's most accurate picture mode (such as Cinema or Filmmaker Mode) before measuring, and turn off any dynamic tone mapping where the TV allows it.
Exact Output from a PC
As with any software test pattern generator, the PC's own colour settings sit between Calibration Client and the display. For exact output:
- Use full screen
- Load no ICC profile or calibration (VCGT) on that display - or leave Neutralise calibration curves on (the default, in the Window section of the menu): the display's VCGT is set neutral while Calibration Client runs, and put back exactly afterwards
(See What is wrong with ICCs?) - Turn off Windows Night Light, and Automatically manage color for apps for that display
(Windows Settings, System, Display - Color profile. Windows can switch this back on by itself after graphics card settings are changed, so check it again after any change) - Set the graphics card's output to RGB, Full range
(A YCbCr link, often chosen for 4K60 over HDMI, converts every patch - use DisplayPort, or a lower refresh rate) - Leave the graphics driver's colour settings at their defaults
(NVIDIA: Override to reference mode - this also bypasses any VCGT) - Turn off graphics card dithering, if the driver allows
Windows Colour Checks
Calibration Client checks the display the patch window is on every few seconds, and whenever the window moves to another display. Anything that would alter the patches is shown in the window title and in the information text - never over the patches:
- Night Light on - every patch is shifted warm
- A Windows Color filter (Accessibility) on - such as greyscale or inverted, easily switched on by accident with Windows+Ctrl+C
- Automatically manage color for apps (Auto Color Management) converting the display's colours
- A YCbCr link to the display, rather than RGB
- Windows HDR on in an SDR mode (SDR patches are remapped by Windows), or off in HDR mode
- An 8-bit link in a 10-bit mode, where the 10-bit values are reduced or dithered
- Calibration curves (VCGT) loaded, with Neutralise calibration curves off
- Windows calibration data (MHC2) applied in HDR or Auto Color Management - for example from the Windows HDR Calibration app
- On a laptop's own screen, Change brightness based on content, or adaptive brightness from the light sensor - the brightness follows the picture or the room
- Running in a Remote Desktop session - the patches go to the remote session, not to the display
- On NVIDIA graphics cards, Limited range (16-235) output - read directly from NVIDIA's driver
On other makes of graphics card the output range cannot be read, so needs checking by hand - as do the graphics driver's own picture adjustments (such as NVIDIA's Digital Vibrance), and dithering, on any card.
Range Check
No PC, or any other source, can read the display's own Full/Legal setting - it is a setting inside the display. Calibration Client checks the two things that can be known, and warns if they are likely not to match:
- What the PC sends - read from the graphics driver on NVIDIA cards
- How the display will take it, from what the display declares about itself (its EDID):
(DisplayPort, and HDMI displays that declare they follow the PC's range signal, always match whatever is sent. HDMI displays that ignore the signal take TV formats, such as 1920x1080 or 3840x2160 at 24-60 Hz, as Legal, and PC formats as Full. DVI is always Full)
On other makes of graphics card, where the PC's range cannot be read, Calibration Client says when the display's range setting needs checking by hand.
Display Information & Support File
With any active licence, the Information section of the menu offers:
- Display information - the link to the display (connection, mode, format, bit depth, Windows HDR, NVIDIA settings), the range check, Windows' colour settings, and the display's EDID: name, formats, deep colour, the range signal, colorimetry, HDR support and declared luminance, and Dolby Vision
(Shown only while the menu is open, so never in a measurement) - Save support file - the same information, with the settings, the display's EDID data and the session log, in one text file to send with any support request
(The product key is not included)
Neutralise Calibration Curves
Calibration curves loaded into the graphics card - by an ICC profile, or directly by a program such as SpaceMatch - alter every patch. With Neutralise calibration curves on (the default, in the Window section of the menu), Calibration Client sets the patch display's curves neutral while it runs, and puts them back exactly:
- When the option is turned off
- When the window moves to another display (that display's curves are then neutralised instead)
- When Calibration Client closes - and, should it ever end unexpectedly, the next time it starts
If another program loads curves again while Calibration Client is running, they are neutralised again within a few seconds, with a warning to close or disable that program. Only the patch display is affected - the PC's other displays keep their curves.
Note: on NVIDIA graphics cards, Override to reference mode bypasses the curves altogether, so Windows can show curves as loaded that are not actually reaching the display.
For a signal path that bypasses the PC's display settings altogether, use a video card with the Hardware option, or PiTPG.
Patterns & Images
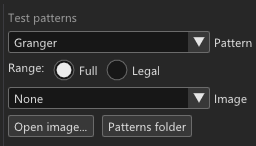
All patterns and images are chosen in the Test patterns section of the menu, and work in every output mode, including HDR and video card output. Any patch from ColourSpace ends the pattern or image, so measuring always shows patches.
Test Patterns
The same Test Patterns as ColourSpace's Manual Measure window - Probe Alignment, Granger, Contrast, Brightness, ANSI 1 and 2, Corner-Box 1 and 2, the black to white ramps, and FALD. Calibration Client draws each pattern itself at the window's resolution, so it is sharp at any size, at 10-bit precision in the 10-bit modes. Range sets the levels to match ColourSpace's Patch Scale - Full or Legal. Each pattern fills the window, so resize the window to change its size.
Calibration Images
Light Illusion's display set-up images, drawn by Calibration Client to fill the window at its own resolution, so they are always pixel-sharp, at 10-bit precision in the 10-bit modes. Use them to set the display's controls before profiling:
- Brightness Cal - set the black level (Brightness)
- Contrast Cal - set the white level (Contrast)
- Clipping - see where blacks and whites clip
- Contrast Ratio - measure true (simultaneous) contrast, with a black and white checkerboard
- Contrast Min/Max - black and white on mid grey
- Sharpness Cal - set Sharpness, so there are no halos round the one-pixel lines
- Grey - check grey balance with a probe
- Bars and Black - check data levels against video levels
- Colour Ramp 1-3 and BW Ramp - look for banding and artefacts
- FALD Test - judge local dimming haloes and zones
- Aspect Ratio - the circle must look round
The calibration images carry fixed video and data levels, so Range does not apply to them.
Your Own Images
- Copy TIFF, PNG, TGA or JPG images into the Patterns folder - the button in the menu opens it - and choose them from the Image list, or use Open image... for a file anywhere on the PC
- Images are shown untouched - no colour management, gamma or filtering - and are never scaled: each image pixel is one screen pixel (1:1), centred on black
- 8-bit images give 8-bit values; 16-bit PNG and TIFF images give 10-bit values, so need a 10-bit output mode
Video Cards
With the Hardware option, Calibration Client sends the patches out of the SDI and HDMI outputs of an AJA or Blackmagic video card or Thunderbolt unit, as well as to the patch window, which keeps showing the same patches with the menu. The video card path does not go through the PC's display settings, so the values reach the SDI and HDMI cables exactly.
Supported Cards and Thunderbolt Units
- AJA - Kona and Corvid PCIe cards, and Io and T-Tap Thunderbolt units, with AJA's driver (AJA Desktop Software) installed
(4K needs a card that sends 4K over a single cable, such as the Kona 5, Kona X, Io X3, T-Tap Pro and Corvid 44 12G. Older cards that need four cables for 4K can send HD only) - Blackmagic - DeckLink PCIe cards, and UltraStudio Thunderbolt units, with Blackmagic's driver (Desktop Video 16 or later) installed
(4K where the card sends it over a single SDI or HDMI connection, such as the DeckLink 8K Pro, DeckLink 4K Extreme 12G and UltraStudio 4K Mini. Capture-only models, such as the DeckLink Mini Recorder and UltraStudio Recorder 3G, cannot be used)
A Thunderbolt unit needs a PC with a Thunderbolt port. Windows may ask for a new Thunderbolt device to be approved the first time it is connected.
Each card reports the formats it can send, and only those are listed, so the card itself decides what is possible.
Using a Video Card
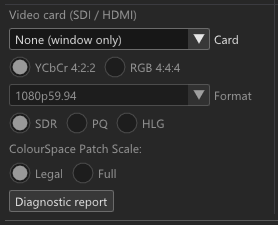
- In the Video card section of the menu, choose the card
(None - patch window only) - Choose the signal - YCbCr 4:2:2 or RGB 4:4:4
(RGB 4:4:4 is only offered when the card can send it) - Choose the Format - 720p, 1080i, 1080p or 2160p, at the frame rates the card can send with the chosen signal
- Choose SDR, PQ or HLG
- Set the ColourSpace Patch Scale option to match the ColourSpace Patch Scale - Legal is recommended
The Signal
- YCbCr 4:2:2 (the default) - 10-bit, Legal range, the standard professional video signal - calculated exactly by Calibration Client from ColourSpace's values (Rec.709 for SDR, Rec.2020 for HDR), and passed through the card untouched
- RGB 4:4:4 - 10-bit, ColourSpace's values sent unchanged, in its Patch Scale range (Legal or Full), with the range signalled on SDI and HDMI
(SDI reserves codes 0-3 and 1020-1023, so Full range values there go out as 4 and 1019) - RGB 4:4:4 over SDI uses single, dual or quad link as the format needs:
- AJA - 3G-SDI dual link on one cable, for HD formats up to 30 frames per second, 1080i and 720p, plus RGB on HDMI
- Blackmagic - the card's own 4:4:4 SDI output, with the link chosen to suit the format and card (for example, a 12G card sends up to 2160p30 on one link, and 2160p50/60 on two)
- SDR, PQ and HLG are signalled in the SDI payload ID and, on HDMI, with the HDR InfoFrame, using the HDR metadata values
- In YCbCr, with Patch Scale set to Legal, ColourSpace's values go out exactly; Full values are scaled into the legal range. Test patterns on the card follow the same setting
- Every SDI output and the HDMI output carry the signal (for 4K, the first SDI output and HDMI)
Anything the card cannot do - a format, or 4K on an older card - is refused with the reason, never swapped for something else.
Diagnostic Report
The Diagnostic report button saves a text file listing the card, its driver and firmware, the settings in use and every set-up step. With AJA cards, each frame is also read back from the card and checked against what was sent. If something doesn't work as expected, send this file with your support request.